
The company Cendris offers address check and postcode check services for addresses in the Netherlands.
Cendris has two webservices: "AdresXpress" and "AdresCheck":
· AdresXpress has as input: Postal code and house number; it returns the full address.
· AdresCheck has as input: Street name, house number and town; it returns the postcode.
Vubis supports 1 to 10 possible addresses for each borrower.
The matching between the Cendris fields and Vubis data is as follows:
|
Cendris field name |
(English translation of Cendris field) |
Vubis data |
|
username |
|
parameter in AFO 482 (see below) |
|
password |
|
parameter in AFO 482 (see below) |
|
straatnaam |
(street name) |
Street or part of Street (parameter in AFO 482) |
|
huisnummer |
(house number) |
Number or part of Street (parameter in AFO 482) |
|
woonplaats |
(town) |
Place/city/town |
|
netnummer |
(phone area code) |
- [we do not use this information] |
|
postcode |
(postal code) |
Postcode |
|
status (only AdresXpress) |
|
- |
|
match (only AdresCheck) |
|
- |
It is assumed that the fields Postal Code, Street and Place/city/town are used for what they say that they are used for.
Theoretically you can put any value in any field. If for example one uses Line1, Line2 etc. to store the address data, the Cendris Web Service won't work.
Please contact Infor if you want to use this functionality.
After selecting this menu option, an input form will be displayed:
In use: This is the general variable to switch on and off the address webservices. It is checked before every action. The default is OFF.
Internet address of the server: This is the Internet address of the server.
Post address of the server: This is the address of the http post on the server.
User name: This is the information sent to Cendris Webservice in the field "username".
Password: This is the information sent to Cendris Webservice in the field "password".
Where is the house number: Use this to specify in which part of the borrower address the house number is stored.
Show option postal code check: Use this option to specify what must happen in AFO 431.
Show option address check: Use this option to specify what must happen in AFO 431.
Automatic check: Perform automatic check in AFO 431.
The automatic check is performed when clicking the button on the borrower entry/update form. So in this case, the specific buttons for the address webservice are not needed.
Automatic update: Perform automatic update after modifying the data.
If not, the form is shown again with the new data retrieved from the Web Service.
Bulk check method: Method used for the bulk check on a borrower savelist in AFO 141.
Bulk check: Automatic update. The default is OFF. If this option is OFF, the bulk check only reports about errors. If this option is ON, the borrower records in the database are updated.
AFO 434 allows for the registration of “contacts” with borrowers. These “contacts” are stored “on top of” contact moments that are automatically registered when a borrower is involved in a transaction in the circulation module (e.g. when he checks out an items, pays a fine, etc.). These contacts can be face-to-face, by telephone, via email, via letters, or through any other type of communication. The contacts can be of multiple types. The contacts can be registered without any follow-on, but can also lead to follow-on actions that need to be taken. An example of the latter case is when a borrower reports an issue that needs to be dealt with.
AFO 434 can be used to register visits, meeting attendance, complaints, questions or any other type of “contacts” between the borrower and the library.
Contacts are registered as contact incidents, which can consist of one or more contact events. As such a contact incident has a two level structure: (1) the main contact incident level, and (2) the contact instance level. The second level is repeatable.
The main contact incident level contains the information that describes the incident in general. Properties on this level are: status, category, description, etc. The contact instance level contains information for each subsequent contact event related to the main contact incident (e.g. each event that is related to the contact incident). In other words: the contact instance level is a chronological string of contacts related to the initial contact incident.
The following system functionality is supported:
·
ability to register a contact incident and the associated “events”
·
storage of related emails and documents
·
a tracking system for follow-up of actions
·
a reporting function to extract incidents
·
email capabilities.
This functionality can be accessed via AFO 431 with the option , in which case only information for a particular borrower is displayed.
Alternatively the functionality can be accessed via AFO 434, in which case information for all borrowers with contact incidents is available as well as the option to add additional incidents for borrowers.
The parameters related to this functionality are set in this section.
After selecting this menu option a sub menu is displayed:
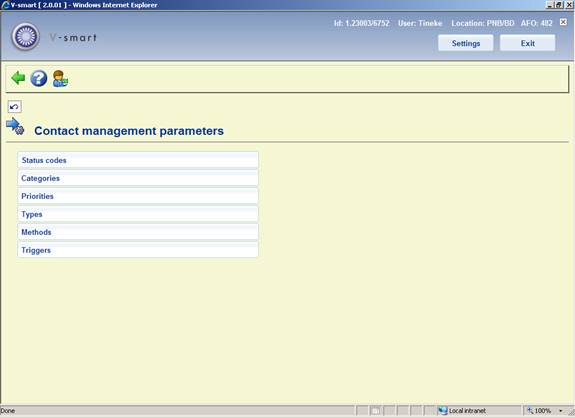
The options are described in the next paragraphs.
After selecting this menu option, an overview screen is displayed:

: Use this option to add a new status code. See section 482.37.1.1.
: Select a line and then this option to view / modify the details of an existing code. See section 482.37.1.1.
: Select a line and then this option to delete the selected code. The system will prompt for confirmation.
After selecting the option or an input form will be displayed:
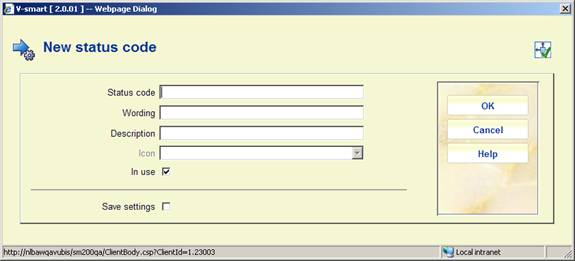
Status code: A unique code identifying the status.
Wording: A brief description of the code. This will appear in the Status column in AFO 434 as well as in the dropdown list for assigning statuses in AFO 434.
Description: Additional information about the code that will only appear here.
Icon: A standard status icon can be selected to add to the code. This will appear in the left hand column of the overview screen in AFO 434.
In use: To denote whether the code is currently in use or not.
Notes
·
The user-defined statuses can be used on top of the default system statuses.
·
User-defined statuses that are not in use cannot be attributed to incidents.
·
It is NOT mandatory to define these parameters.
After selecting this menu option, an overview screen is displayed:

: Use this option to add a new category code. See section 482.37.2.1.
: Select a line and then this option to view / modify the details of an existing code. See section 482.37.2.1.
: Select a line and then this option to delete the selected code. The system will prompt for confirmation.
After selecting the option or an input form will be displayed:
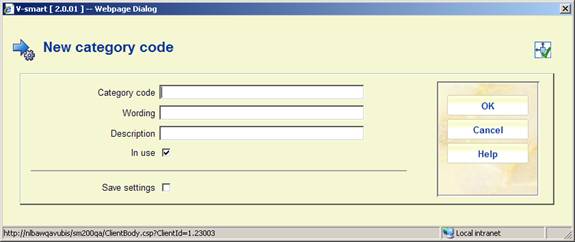
Category code: A unique code identifying the category.
Wording: A brief description of the code. This will appear in the Category column in AFO 434 as well as in the dropdown list for assigning categories in AFO 434.
Description: Additional information about the code that will only appear here.
In use: To denote whether the code is currently in use or not.
Notes
·
Categories that are not in use cannot be attributed to incidents.
·
To be able to work with the Contact incident management, at least one category that is in use must exist. If this is not the case, a message will appear in the management of contact incidents, pointing out that the system is not configured correctly.
After selecting this menu option, an overview screen is displayed:
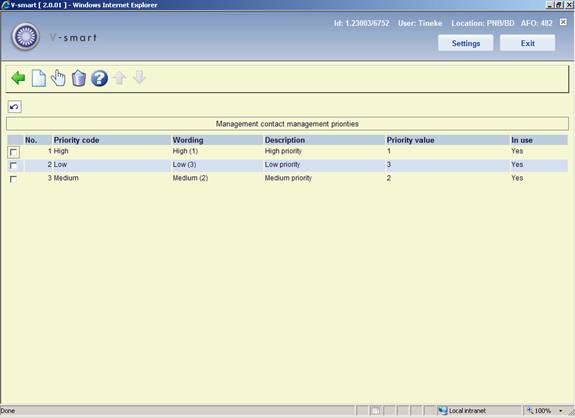
: Use this option to add a new priority code. See section 482.37.3.1.
: Select a line and then this option to view / modify the details of an existing code. See section 482.37.3.1.
: Select a line and then this option to delete the selected code. The system will prompt for confirmation.
After selecting the option or an input form will be displayed:
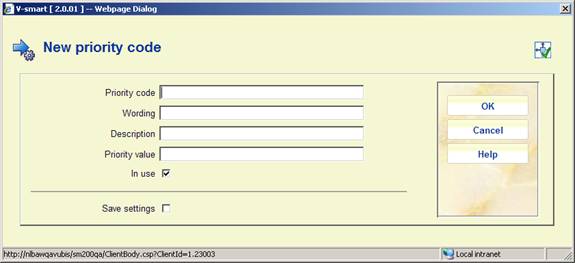
Priority code: A unique code identifying the priority.
Wording: A brief description of the code. This will appear in the Priority column in AFO 434 as well as in the dropdown list for assigning priorities in AFO 434.
Description: Additional information about the code that will only appear here.
Priority value: This field is for future use.
In use: To denote whether the code is currently in use or not.
Notes
·
Priority codes that are not in use cannot be attributed to incidents.
·
It is NOT mandatory to define these parameters. If no priorities are defined, the system will automatically attribute the priority 1 to an incident.
·
Default priorities can be linked to an Incident Type.
·
Priorities that are in use as the default priority for an Incident Type cannot be set to Not in use. Priorities that are attached to existing contact events can be set to Not in use.
· The assumption is that 1 is the highest priority.
After selecting this menu option, an overview screen is displayed:
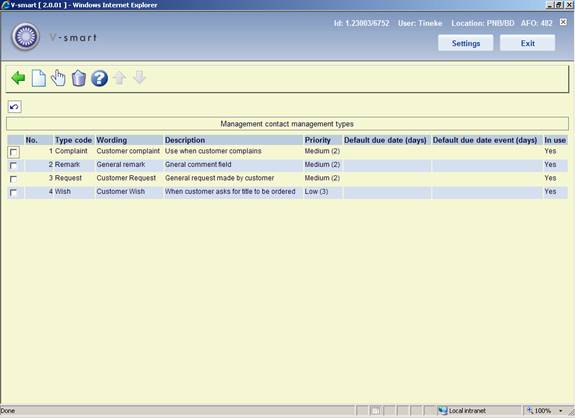
: Use this option to add a new type code. See section 482.37.4.1.
: Select a line and then this option to view / modify the details of an existing code. See section 482.37.4.1.
: Select a line and then this option to delete the selected code. The system will prompt for confirmation.
After selecting the option or an input form will be displayed:

Type code: A unique code identifying the type.
Wording: A brief description of the code. This will appear in the Type column in AFO 434 as well as in the dropdown list for assigning priorities in AFO 434.
Description: Additional information about the code that will only appear here.
Priority: Select a default priority for the type from the dropdown list. This can be mdofied when assigning the code in AFO 434.
Default due date (days): Enter a default due date for the type [the number of days that is defined as the period in which the incident should be closed].
Default due date event (days): Enter a default due date for an event attached to an incident of this type [the number of days that is defined as the period in which the event should be “closed” – the latter implies in fact that either the event is closed or a new (next) event is created].
In use: To denote whether the code is currently in use or not.
Notes
· All properties, with the exception of the Type description, are mandatory.
· Types that are not in use cannot be attributed to incidents.
· To be able to work with the Contact incident management, at least one type that is in use must exist. If this is not the case, a message will appear in the management of contact incidents, pointing out that the system is not configured correctly.
After selecting this menu option, an overview screen is displayed:
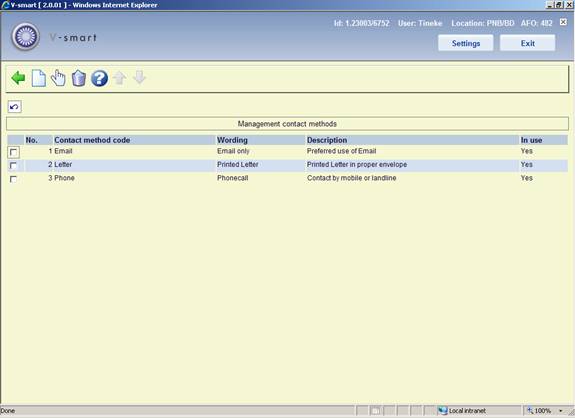
: Use this option to add a new method code. See section 482.37.5.1.
: Select a line and then this option to view / modify the details of an existing code. See section 482.37.5.1.
: Select a line and then this option to delete the selected code. The system will prompt for confirmation.
After selecting the option or an input form will be displayed:
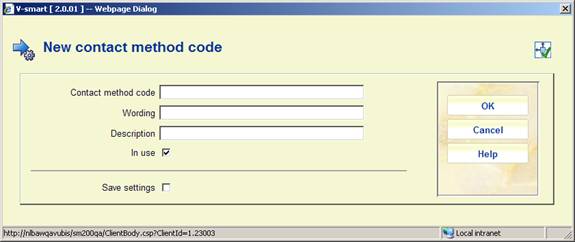
Contact method code: A unique code identifying the contact method.
Wording: A brief description of the code. This will appear in the Type column in AFO 434 as well as in the dropdown list for assigning types in AFO 434.
Description: Additional information about the code that will only appear here.
In use: To denote whether the code is currently in use or not.
Notes
·
Methods that are not in use cannot be attributed to incidents.
·
To be able to work with the Contact incident management, at least one method that is in use must exist. If this is not the case, a message will appear in the management of contact incidents, pointing out that the system is not configured correctly.
The following parameters are used by the trigger batch process. The trigger parameters are defined as rules. None, one or more rules can exist on a single system.
Each rule is defined for a combination of event type and receiver. The rule properties are linked to the type/receiver combination. These combinations define the scope of the rule and can have the following formats:
|
* |
general rule |
applies to all event types and all receivers |
|
type/* |
rule for a specific event type |
applies to a specific event type but to all receivers |
|
type/receiver |
rule for the combination of a specific event type and a specific receiver |
applies to the specific combination of an event type and a receiver |
After selecting this menu option, an overview screen is displayed:

: Use this option to add a new trigger code. See section 482.37.6.1.
: Select a line and then this option to view / modify the details of an existing code. See section 482.37.6.1.
: Select a line and then this option to delete the selected code. The system will prompt for confirmation.
: Use this option to process the triggers. The system will swicth to the standard screen for executing processes.
After selecting the option or an input form will be displayed:

Trigger code: A unique code identifying the trigger.
Scope: As described in the above table; the scope must be unique for the rule, i.e. the same scope can only be attached to a single rule, independent of the fact that the rule is or is not in use.
Report to: Select the required user name(s) from the list.
Report to incident owner: When this is checked the owner of the incident will be notified something needs to be done.
Report to next action owner: When this is checked the owner of the next action will be notified something needs to be done.
Timing: Trigger action timing [x1,x2,x3,…xm] [in which x[1:1:m] = -n:1:0:1:n].
Email: When this is checked the owners will be notified via email.
Description: Additional information about the code that will only appear here.
In use: To denote whether the code is currently in use or not.
· Document control - Change History
|
Version |
Date |
Change description |
Author |
|
|
1.0 |
June 2008 |
creation |
|
|
|
1.1 |
August 2008 |
replaced some screen shots; new options for post code maintenance |
|
|
|
2.0 |
October 2009 |
improved variosu explanantions; punctuation for borrower addresses; expiry date parameter; new menu options for Web service borrower address and Contact management |
|
|
|
3.0 |
July 2010 |
new option for address changes for related borrowers; various clarifications; new fields for ILL |
|
|